Exploring the Ultimate $ony Multi Loader, Part Two
- Posted by mariteaux on February 12th, 2022 filed in Sperging
- Comments Off on Exploring the Ultimate $ony Multi Loader, Part Two
So in between vibing with some archived ThinkGeek catalogs, sorting out Somnolescent Radio, chewing through the rest of the Rediscovering pile, moving archives stuff to the Internet Archive, finishing the Gonzo story, and just all around feeling more alive than I have in a while, as one of my last posts on here, I’ve decided to finish up a little saga from mid-2021: PS2 executable loaders.
If you’re new or rusty (like me), back when we were working on Guitar Hero II Deluxe 2.0, we suddenly had a need to load seven different versions of the game in a user-friendly way. Realizing uLaunchELF wasn’t gonna cut it, I remembered that demo discs were built exactly for launching different games in a user-friendly way, and it led us to the “Ultimate $ony Multi Loader”, a horrifically named, garbage jumble of usually non-English information pertaining to various European demo disc menus and loaders.
Two loaders fall under that banner interchangeably (grr)–the “OPS2M loader” I covered in part one, and the “pack-in loader” we’ll be discussing today. We tried the former for a bit, and while I still love the look and sound of it, we just didn’t think it fit GH2DX. Really, we wanted the other one, with its simpler interface and ability to switch out the music and background video. Eventually, we found it, and a few ELF patches to fix control issues and get it running on NTSC later, and it became our loader of choice.
Here’s my findings for customizing that loader.
Introduction
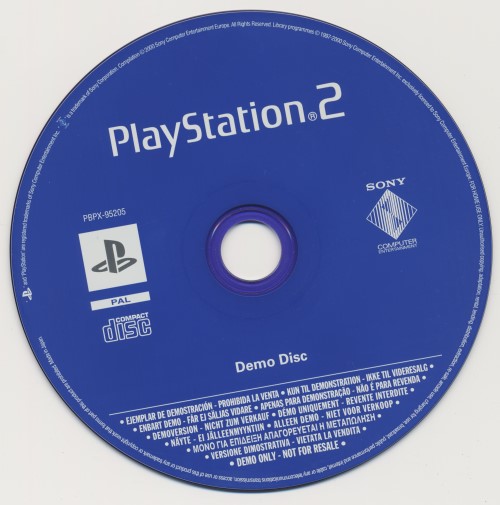
I call this the “pack-in loader” because it’s the loader for the demo disc you would’ve gotten with your PS2 had you bought one between launch in 2000 and 2003…in Europe. (Technically, there’s multiple versions of this demo disc. No idea about differences in their loaders, but it’s a rabbit hole I’m not interested in going down.) It’s a bog standard CD-ROM, containing demos for FIFA 2001 and SSX Snowboarding, videos for some more noteworthy titles like Ridge Racer V, Dead or Alive 2, and…a fully working copy of Yabasic.
The BASIC dialect. On a PS2. What’s that about?
(Fair warning, this loader has a lot of lore, but you enjoy that.)
The gist is that video game consoles were once subject to a European Union import tariff, and Sony tried to get around this by including a Yabasic interpreter on a demo disc, thereby arguably making the PS2 a personal computer you could write software for and not a game console. Thus, not subject to the tariff. In fact, Sony would’ve stood to get back several million Euros if the courts agreed.
It didn’t work. Europe’s court of first instance in Luxembourg stated flat out the PS2 was clearly a video game console, crappy BASIC interpreter or not. The point was ultimately moot, as in 2004, the import tariff was repealed, and Sony stopped including the demo disc with new consoles.
The version of the demo disc we’ll be looking at today has the disc ID PBPX-95205, if you’re looking for a clean rip. PBPX was the disc ID largely used for pack-in software for both the PS1 and PS2 in Europe and Japan. (As far as I can tell, we never got any PBPX software stateside.) The reason I refer to this disc as PBPX-95205 is because this disc had no official name! It was simply labeled as “Demo Disc”, and that’s also what Redump recognizes it as.
While the “OPS2M loader” could be edited by zeroing out a decryption key hardcoded into the executable, we’re able to edit this one thanks to a program called conftool.exe. This tool is one of Sony’s own, and it’s explicitly for encrypting, decrypting, and testing demo disc configs. Sample output:
---Demo Disc Config Tool---
1. [E]ncrypt a config file
2. [D]ecrypt a config file
3. [T]est a config file
4. [Q]uit
d
--------- Decrypt ---------
source file [default:config.dd2]:
opening file: config.dd2
file size is 14999 bytes
output file [default:configx.txt]:
writing file: configx.txt
file size is 14999 bytes
---Demo Disc Config Tool---
1. [E]ncrypt a config file
2. [D]ecrypt a config file
3. [T]est a config file
4. [Q]uit
The program was accidentally included on the German OPS2M demo disc for April 2004, giving us full access to the capabilities of any loader up to that point. (Though admittedly, I’ve only ever gotten it to work on PBPX-95205’s config.) You can download my copy here, and it’ll also come with the loader zoo disc featured at the end of this article.
The process for editing configs is rather basic: decrypt, edit in plain text, re-encrypt, build a new disc image. It’s really important to make sure you’re in the correct working directory when you load conftool. If you double click the executable and use its menu through the Command Prompt, it’ll set it correctly, but it won’t necessarily be set correctly if you open it through the Command Prompt itself. The program is not especially foolhardy, and it’ll try to read from bad memory addresses and crash if it can’t find the file in question.
You’ll get odd, “bleeding” visual artifacts, plus a nice lockup, if the disc fails to load the new config. Thus, I’d recommend testing out your newly-encrypted config before you build a disc with it. If your command prompt quits or gives an error, there’s a bug in your config. If you see this instead:
** If you can see this message then the config.txt file parsed correctly **
You’re golden.
Config structure
To clarify two terms I’ll be using a lot. Blocks are chunks of setting or localization text separated with at least one empty line. Items are groups of blocks with the same internal name, which together, pertain to either global menu settings or a specific demo/video. There’s usually multiple blocks for each item thanks to each item being in several different languages, something I’ll get into in a moment.
Blocks all begin with an asterisk (*), then one of six characters, x, 0, 1, 2, 3, or 4, and then the name of the item. Each menu item starts with a general *x: block for its settings, and then five number blocks for localization strings. To be counted together, the localization blocks need to be named the same as the settings block.
As this was a European disc, all text comes in five languages, British English (“reinitialising” confuses the shit out of us Americans…), French, German, Spanish, and Italian, 0-4 respectively. Which language you’ll see depends on what language your PS2 is set to.
We cut 1-4 out for GH2DX 2.0, but this might’ve been a sorry move in hindsight, seeing as the loader crashes if someone has their PS2 set to a language other than English. Keep ’em, even if you just change them all to English text. Nevertheless, for brevity, I will only be pasting in the 0 (English) block for each of my examples. You can see a full decrypted original config here for context.
So you know what to look for that config, here’s a screenshot of the loader on its own with some of its different moving parts annotated:
Menu and attract items
*x:MENU
OPT=FIFA2001
OPT=SSX
OPT=WWR
OPT=DOA2
OPT=FANTAVIS
OPT=ISSPRO
OPT=RIDGERV
OPT=FINDMYOWNWAY
OPT=YABASIC

*x:ATTRACT
OPT=RIDGERV
OPT=FIFA2001
OPT=FANTAVIS
OPT=SSX
OPT=DOA2
OPT=WWR
OPT=ISSPRO
OPT=CREDITS
OPT=INTROMOV
The first two items on the disc are lists of options, both for the selectable items on the menu and for what menu items might potentially get picked when the disc is left idle. Sony set all the videos as attract options, plus the intro movie, and then the credits. As there’s no text displayed to the player, the MENU and ATTRACT blocks don’t have localization blocks.
Global item
*x:GLOBAL
SPLASH1=cdrom0:\VIDEO\INTROMOV.PSS;1
SPLASH1_TYPE=VIDEO
ATTRACT_TIMEOUT=240
MENU_TIMEOUT=90
HELP_TIMEOUT=120
INTERACTIVE_TIMEOUT=300


*0:GLOBAL
DISCLAIM=The preview levels contained in this disc are taken from products still in development and as such do not represent the quality and appearance of the final products.
RELOADMSG=Reinitialising menu system...
RESET=Please reset your console after playing this demo.
BACK=Back
QUIT=Quit
PLAY=Play

GAME=GAME
EXTRA=EXTRA
VIDEO=VIDEO
The global item sets the various traits of the menu itself. SPLASH1 is the bootup video, and thankfully, unlike the OPS2M loader, this one is just a generic PSS file and you can switch it out without issue (though I think you still need one). I don’t quite remember what ATTRACT_TIMEOUT and INTERACTIVE_TIMEOUT mean, but MENU_TIMEOUT is how long the menu will wait with no input before calling one of the attract videos, and HELP_TIMEOUT is how long the controller menus will wait before they kick you back to the main menu.
I seem to recall these times (and all times set in the config, in fact) not exactly corresponding to how long the text appears on screen in seconds. You might have to fiddle with it and maybe overshoot your desired seconds count, just in case.
RELOADMSG is a generic setting across most blocks in this config. It’s the text displayed when you return from a demo or video. As far as I can tell, RESET is never used; when such text was needed, Sony just baked it into the splash text of that demo.
The last three strings get displayed in the top horizontal bar of the menu and tell the player what the type of item they’re on is (a demo, a video, or an “extra” like Yabasic or the Find My Own Way demo). You can change all these to whatever you want, if you want to use that space to brand your disc instead. We set our GAME string to say MILOHAX instead, for example. If you only have executables on your disc, you can also delete the extra two strings with no ill effects.
Menu items
Game, video, and extra items all work off very similar settings, so excuse the long section. Just because you don’t see a setting used with a particular item doesn’t mean it can’t be used. For example, splash text is only set on the extra item example here, but it will work on game items as well, in case you wanted explanatory text before your demo or executable.
So to be clear: you set the internal name of the demo in the MENU block at the start of the file, and then later in the file, you have an item named that internal name, which directly sets which executable/video file to load and long and short titles for that item, among other things. The short title is what appears in the bottom horizontal bar, the one that scrolls with the menu choices, and the long title is what displays in the “echoing” text above those bars.
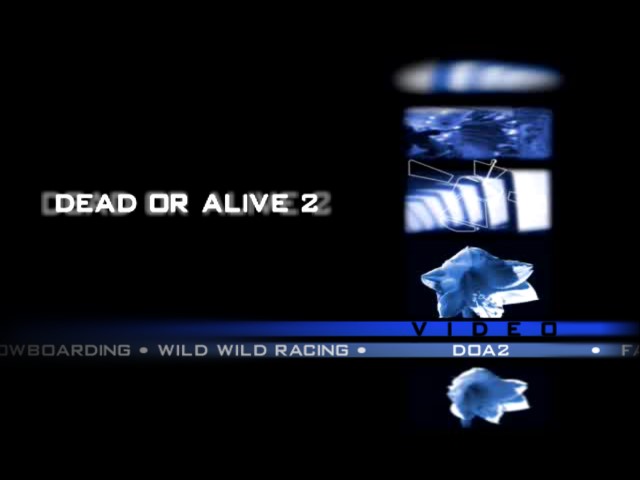
Game blocks are the most complex, so we’ll start with one of them.
*x:FIFA2001
FILE=cdrom0:\FIFADEMO\GAMEZ.ELF
FILETYPE=EXECUTABLE
FLASH=165
TYPE=GAME

*0:FIFA2001
LONGTITLE=FIFA 2001
SHORTTITLE=FIFA 2001
PAD_TRIANGLE=Sprint
PAD_CIRCLE=Shoot/Tackle
PAD_CROSS=Pass/Switch player
PAD_SQUARE=Lob/Aggressive tackle
PAD_START=Change camera
PAD_LSTICK=Movement
PAD_STARTSEL=Quit
RELOADMSG=FIFA 2001<br><br>Available now
FLASH refers to the IOPRP image the game will try to load. PBPX-95205 comes with four, 16, 20, 165, and 202, though you can add more, and you should make sure the one your executable wants is in the SCEE_DD folder. If the IOPRP image it wants isn’t in there, the disc will stall on executable load.
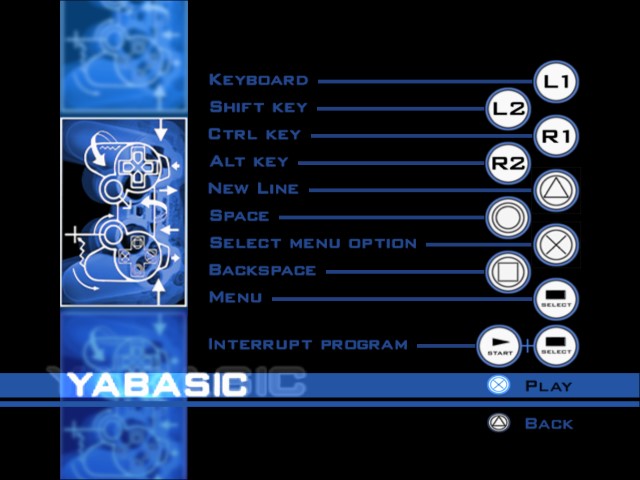
One incredibly novel thing about this loader is that you can set the text that explains game controls before each game loads. Here’s all the usable buttons, according to digging into the executable. The shoulder buttons are specified in a different part of the executable, but they do work.
PAD_TRIANGLE
PAD_CIRCLE
PAD_CROSS
PAD_SQUARE
PAD_SELECT
PAD_START
PAD_LSTICK
PAD_RSTICK
PAD_STARTSEL
PAD_L1
PAD_L2
PAD_R1
PAD_R2
PAD_L3
PAD_R3
One bizarre quick of conftool is that it really does not like PAD_SELECT, despite being a perfectly valid, working button to the loader itself. Using this in your config will cause it to fail validation. Seems like even Sony weren’t planning on using it, but yes, you can use it. I’ve also not tried L3 and R3, but they are there in the executable (around offset 1A04A0), so hey, have a play.
Video items are simpler. These still have control text, but only to exit the video. Despite the following example, videos do not need an IOPRP image specified. Sony left that in out of laziness and sloppiness, most likely.
*x:DOA2
ATTRACT_TIMEOUT=90
INTERACTIVE_TIMEOUT=90
FILE=cdrom0:\DOA2\DOA2.PSS;1
FILETYPE=VIDEO
FLASH=165
TYPE=VIDEO
RELOADMSG=DOA2 DEAD OR ALIVE 2<br><br>Available 13/12/2000

*0:DOA2
LONGTITLE=DEAD OR ALIVE 2
SHORTTITLE=DOA2
PAD_STARTSEL=Quit
RELOADMSG=DOA2 DEAD OR ALIVE 2<br><br>Available 13/12/2000
Finally, extras work like games and do require an IOPRP image. The most noteworthy thing is that Yabasic comes with splash text before the executable loads, and that can be set on any menu item. Surprisingly enough, a bit of HTML is supported through line breaks and paragraph breaks (paragraph breaks providing a bit more dividing space). I’ll get more into this loader and HTML later on.
*x:YABASIC
ATTRACT_TIMEOUT=90
INTERACTIVE_TIMEOUT=90
FILE=cdrom0:\YABASIC\YABASIC.ELF;1
FILETYPE=EXECUTABLE
FLASH=200
TYPE=EXTRA

*0:YABASIC
LONGTITLE=YABASIC
SHORTTITLE=YABASIC
INT_SPLASH1=Use YABASIC to create fun programs in the BASIC programming language.<p>Full instructions are built-in to the program.<br>Some programming knowledge is useful.<br>English, French and German languages are supported.<br>A USB keyboard (optional) can be used with this application.<p>PLEASE RESTART YOUR CONSOLE AFTER RUNNING THIS APPLICATION.
INT_SPLASH1_TYPE=TEXT
INT_SPLASH1_TIME=12
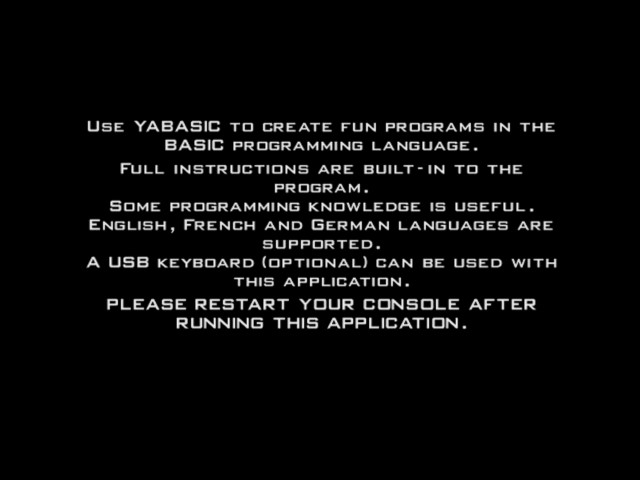
Remember that the wait times are not an exact science (I don’t really know what’s going on there). Read your splash text out loud at a good pace and set the length you want it to appear for accordingly.
Credits item
*x:CREDITS
ATTRACT_TIMEOUT=120
FILE=cdrom0:\VIDEO\CREDITS;1
FILETYPE=CREDITS

*0:CREDITS
RELOADMSG=(c)2000 SCEE
You don’t need credits on your disc, but if you want them, you’ll need to add it as a menu option (giving it a TYPE, SHORTNAME, and LONGNAME so it doesn’t crash the loader) and edit the CREDITS.TXT file in SCEE_DD. It is not loaded from the VIDEO folder like this says it is, the path is hardcoded at offset 19DCC8 in the executable. I can’t tell how to make it load arbitrary text files, but you’ll be able to use that one, at the very least. 45 characters is the absolutely max per line in my experience.
EOF marker
#EOF
After about ten line breaks after the last block in the file (and yes, you need the line breaks), the config ends with an EOF marker. The validation tool in conftool actually calls this a “comment”; I suppose you could therefore leave comments throughout your config by prefacing them with a pound sign? I haven’t tried it.
If you get any bizarre extra characters at the end of the file after decrypting a config, go ahead and delete them. The EOF marker needs to be the last thing in the file.
HTML everywhere!
Bizarrely, the loader also uses HTML for its text formatting! There’s loads of it in the executable. (The OPS2M loader supported HTML to a much more limited extent as well.) It seems to be based on Netscape’s additions to HTML 3.2, with Sony adding (though I haven’t tested this) British English equivalents to <CENTER> and <FONT COLOR> to make it easier on its European devs.
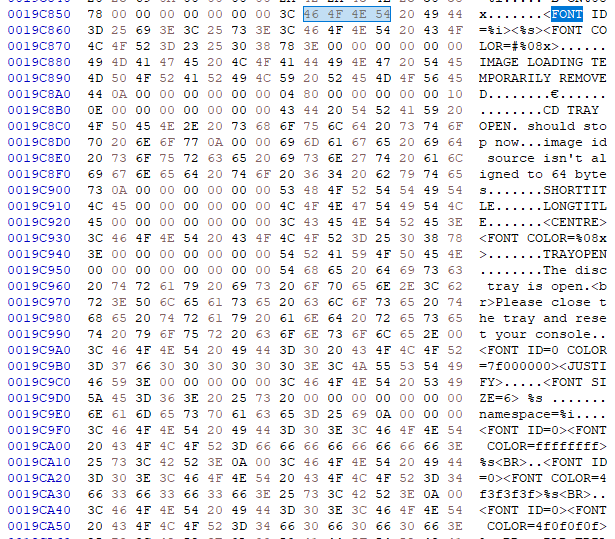
The hex color codes also seem to be in RGBA, given that they’re eight characters instead of six. Absolutely bizarre.
Background video
The background video is easy, but also tricky to change. It’s a video-only IPU file called FRAMES.IPU, which is in the SCEE_DD folder. The path is hardcoded at 19D3F0 in the executable, if you have a wild hair up your ass about changing it.
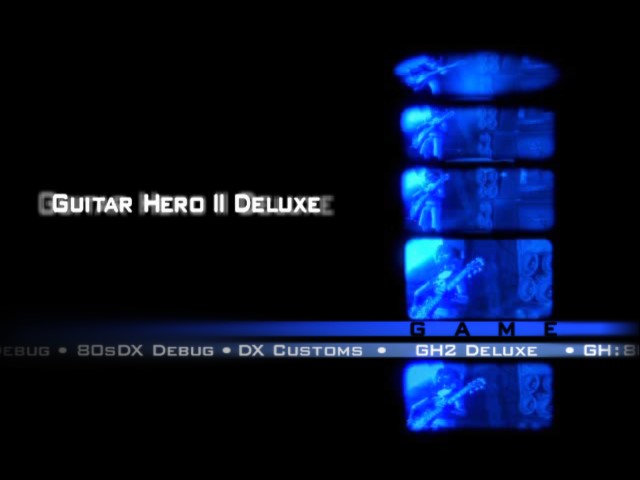
IPU files are basically just MPEG-2 video files, like all other video on the PS2 is encoded in. You’ll need ps2str, some official Sony kit, to encode those. The video size is 320×512; bizarre, I know.
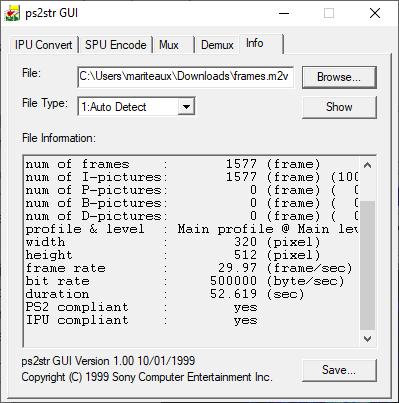
Now, M2V encoding using ps2str is tricky enough without the extra limitations of this loader video. The only program I’ve found that works completely for encoding M2Vs like the PS2 likes is TMPGEnc Plus; thankfully, you can get a period disc image and serial at the Internet Archive. Make sure it’s video-only and make sure the GOP contains only I-frames when you encode. (Despite the PS2 being a conforming DVD player, compliant PSS/IPU files need to have only I-frames, no P- or B- frames. You’ll know if you built a good file if the Info tab in ps2str says it’s both PS2 and IPU compliant.)
Yet, here’s the kicker–the entire video needs to fit in the PS2’s memory. You have a hard cap of 12MB, or else the loader will reject your video outright and the background will be dark. This means you need to either crank the bitrate to unacceptably low levels or keep your loader video short. Our sweet spot was 3MB/s for about 30 seconds of looping background video. You decide what the tradeoff is. Point being, that loader video needs to be 12MB or less–not 500KB over.
Background music
The background music played throughout the menus is a simple VAG file called TESTMONO.VAG in the SCEE_DD folder. The path to this file is hardcoded at offset 19DBA8 in the executable.
As implied, this is mono ADPCM at 44.1KHz 16-bit. MFAudio can convert to and from it with no problem. Sony’s own music loop is 1:17; GH2DX 2.0’s is 1:07 and consists of two instrumental (drum and bass only) rounds of the game’s “Psychobilly Freakout” cover.
TESTMONO.VAG (weird and kinda neat sounding music loop)Keep in mind that you’ll need to use a separate VAG editor to make the music loop if it ends before your disc goes into attract. (The song will always start playing again after the attract has finished.) I used VAG Editor to set loop points and it worked great.
Loader zoo
One final quirk of this loader I’d like to mention is that I could not get the virgin rip of PBPX-95205 to rebuild using my normal method of CDVDGen and Apache2. I had to fall back to using CDGenPS2, but that can’t build DVD images, only CD images. I think this is because PBPX-95205 has some kind of media check; it originally came on CD-ROM, and thus wants to be booted from CD-ROM, and will kick you back to the BIOS if it detects it’s being run on DVD-ROM instead.
This also bit me with the version of Yabasic; I used the one from PBPX-95506 instead, which was a DVD release containing some actually notable PS2 videos and demos, including Klonoa 2, Gran Turismo 3, and the first Jak and Daxter.
In any event, I have another version of the loader that does rebuild, and this one is also converted for NTSC televisions (remember, Europe, so PAL). Like with the OPS2M loader, I’ve built a small loader zoo for toying around with it. There’s a custom intro video, DVD Yabasic (not converted to NTSC, sorry, cba), and credits added to the main menu. You also get conftool.exe, the config in both encrypted and decrypted forms, and the decrypted GH2DX config for shits and giggles.
There’s not as much you can tweak on this one as with the other loader, but the background videos and less specific “flavor” of the music and visuals makes me feel like folks will wanna give this one as much of a look as the OPS2M loader.
Thanks for reading through my attempts at unraveling the mystery of the awfully-named “Ultimate $ony Multi Loader”–hopefully I never have to use that name again. Nice to have all this written down though, finally!
