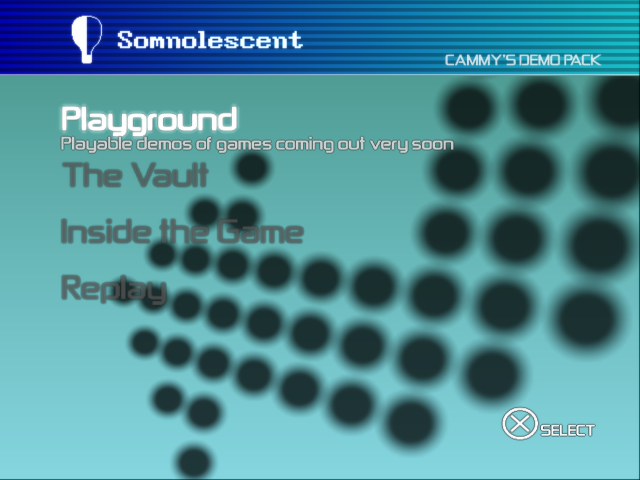
Exploring the Ultimate $ony Multi Loader, Part One
- Posted by mariteaux on September 19th, 2021 filed in Modding
- Comments Off on Exploring the Ultimate $ony Multi Loader, Part One
(2/12/22 update! Part two has been written about the other loader. This page is also massively out-of-date; I’ve since gotten sideways scrolling menus and text prompts and stuff working. It’s pretty tits, though because Guitar Hero guitars only do up and down, scrolling left and right is iffy for discs of that purpose. Anyway, that’ll have to be for another time. What I’ve got here is still mostly accurate, just incomplete.)
Slightly different post for the Scratchpad today. Instead of an essay or a tutorial, this one’s gonna be an infodump on a curious piece of PS2 modding history I’ve been playing with a lot lately. If you follow my YouTube, you’ve probably seen the demo compilation I put together for all the various Harmonix Guitar Hero games, and I’ve also got one I’m gonna post for Amplitude and FreQuency.
At the heart of both discs lies the Ultimate Sony Multi Loader, and this is all the stuff I’ve been able to work out about it so far.
Introduction
In doing research for executable loaders for the various flavors of Guitar Hero II Deluxe 2.0, we stumbled across what’s colloquially referred to as the Ultimate Sony Multi Loader (dollar sign optional). Initially, I described this as a loader cracked from a PS2 demo disc, but it’s actually, essentially, a small cottage industry of various tools that can be used to crack European demo discs, whether that’d be Sony’s own accidentally leaked conftool.exe, or homebrew tools like ops2m.
So, most accurately, I’m covering Sony’s loaders, which we’ve been able to crack with a variety of tools. The total packages are referred to as the “Ultimate Sony Multi Loader”, but it’s an incredibly ambiguous term, and it led to a lot of confusion for me and the DX team.
What I’ll be covering today is the circa-2004 OPSM loader, used in a variety of European magazine demo discs. This is the version of the loader we initially got our hands on and were using for DX. We’re currently using another loader which is often included under the USML umbrella, ripped from one of the generically-named “demo discs” that came with launch PS2s in Europe with the disc ID PBPX_95205. I call this loader the “pack-in” loader, to avoid confusion.
Here’s what a real disc using the OPSM loader looks like:
As you can see from the video, what we’re gonna be doing today with this loader is very basic. Weirdly, though, while I have since tracked down a copy of OPSM #53 in the hopes of decrypting and disassembling it, my copy is almost as basic as the loader we’ve got, only featuring videos and demos, and no sideways scrolling menus or timeline graphics. Even still, what I’ve got working (menus, flavor text, demos, videos) will be enough for the vast majority of people interested in a disc like this.
Config structure
Configs for the OPSM loader come in two flavors, encrypted or unencrypted. The loader uses a byte-for-byte XOR encryption algorithm with the key Sir Robert McAlpine Fine Cranes. ops2m as linked above can encrypt a CONFIG.TXT, or you can do a binary search in the executable of the untouched demo disc for this key and blank it out if you’d rather skip the encryption step. Use of an unencrypted CONFIG.TXT with a disc with this key intact will fail to load and present you with a blank menu at startup.
Because I think seeing me explain this stuff in a vacuum might prove confusing, here’s a full, working example CONFIG.TXT. Stuff’s pretty self-explanatory, but I’ll be going over various options and snags you can hit anyway just so no one’s confused.
Disc block
*disc=DISC
INTROLINE=This is the loader loading text!<BR>I doubt there's a line length limit,<BR>but since the text is left-aligned,<BR>not centered, and thus wouldn't look<BR>as good the full width of the screen,<BR>I aim for about 30-40 characters<BR>per line. 50 would probably look<BR>alright as well.
TRAYOPEN=Close that lid, buckaroo!
NOINTROMOVIE=1
SELECT=SELECT
BACK=BACK
ATTRACTTIMEOUT=600
ATTRACT=TESTMENUS
ROOTMENU=TESTMENUS
The file starts with a *disc= block. All blocks, whether they be menus, menu options, or links start with an asterisk, the type of block, and then the name of the block. Fields are listed underneath.
The INTROLINE field is the most obvious one there. I didn’t know it at the time I wrote that example config, but the loader will break lines on its own, about halfway across the screen; you don’t need to use <BR> like I did.
To explain some of the less obvious fields, TRAYOPEN is the text that displays when the disc tray is open (and the loader doesn’t resume, so feel free to make it as disparaging or as secretive as you like), SELECT and BACK are the text that gets paired with the select and back graphics, and ATTRACT and ATTRACTTIMEOUT pertain to what the disc will try to do when you leave it idle and for how long. If you’d like to disable the attract outright, just point it at the root menu.
Some versions of the loader support a NOINTROMOVIE option in the disc block, but some also don’t. If your loader doesn’t respond to it, try looking for another demo disc base. The zoo base I have linked on this page doesn’t support it, unfortunately. Maybe I’ll update it someday if I locate a loader with support for it.
If you’re renaming blocks (as I tend to do), make sure you keep your names straight! Here’s what’ll happen if you point the disc at something it can’t find:
- Nonexistent menu: A strange type of menu I’ve yet to see triggered legitimately appears with a timeline bar, though without dates. Color disappears (so the menu will be in greyscale), no options will be selectable (nor will you be able to go back), and you’ll get a few stray TLB misses in the PCSX2 console.
- Nonexistent option: You’ll get a blank space in the menu, and you won’t be able to select it. (This can be hard to spot at first, but scroll through the menu until it wraps and you’ll find it.)
- Links without matching options: If any link options are specified without options, while they’ll appear in the menu, you won’t be able to select them. (I think they also show up greyed out, but don’t quote me on that.)
- Nonexistent link: Your text will appear in the menu and you’ll be able to hover over it, but selecting it will do nothing.
In addition, watch out for duplicate options or links. If you specify two links or two options with the same names but with different text and destinations set, the loader will only load the first one for the entire disc. (You might be able to reuse option names, I haven’t looked too deeply into it, but I still wouldn’t recommend confusing yourself. Make sure all blocks have unique names.)
As far as names go, they can be anything so long as they don’t contain spaces. While the generic loader config came with numbered options, I found this confusing, so on some of my personal discs, I’d go with proper names, for example FREQ2 for the option name and AMP_LINK for the corresponding link. Much more obvious at a glance, and if you’re anal about numbers lining up like I am even though no one will see them, when you rearrange the disc, you won’t have to renumber all the options.
Let’s talk about all of the valid blocks for the loader config.
Root menu block
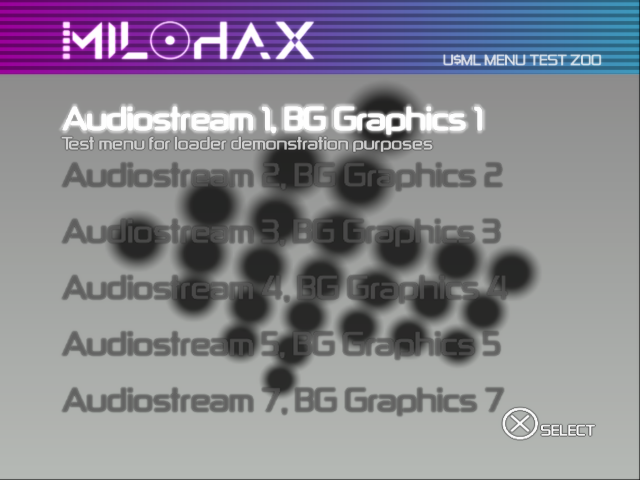
*sections=TESTMENUS
HEADER1=U$ML MENU TEST ZOO
AUDIOSTREAM=0
GFX_DRAWSCANLINES=1
GFX_BG=0
GFX_DRAWVU=0
TOPBAR_ARGBLEFT=00800080
TOPBAR_ARGBRIGHT=00388CB0
BG_ARGBTOPLEFT=00808080
BG_ARGBTOPRIGHT=00808080
BG_ARGBBOTTOMLEFT=00A8ACA8
BG_ARGBBOTTOMRIGHT=00A8ACA8

OPTION=OPTION_1
OPTION=OPTION_2
OPTION=OPTION_3
The root menu and submenus all work the same way, with the fields of the block meant for various customization options like music, widgets, and colors, and then a chunk underneath for all the choices you can select for that menu.
Submenu block
*menu=MENU_2
BACKMENU=TESTMENUS
HEADER1=Audio 2, BG 2
HEADER2=Test menu for loader demonstration purposes
AUDIOSTREAM=2
GFX_BG=2
GFX_DRAWVU=1
TOPBAR_ARGBLEFT=00800080
TOPBAR_ARGBRIGHT=00388CB0
BG_ARGBTOPLEFT=00808080
BG_ARGBTOPRIGHT=00808080
BG_ARGBBOTTOMLEFT=00A8ACA8
BG_ARGBBOTTOMRIGHT=00A8ACA8

OPTION=VIDEO_1
Subtly different from the root menu block; rather than a SECTIONS block, these blocks are MENU blocks. BACKMENU is what menu will be loaded if the player presses the back button. HEADER2 is optional, but will display under the top bar if it’s there.
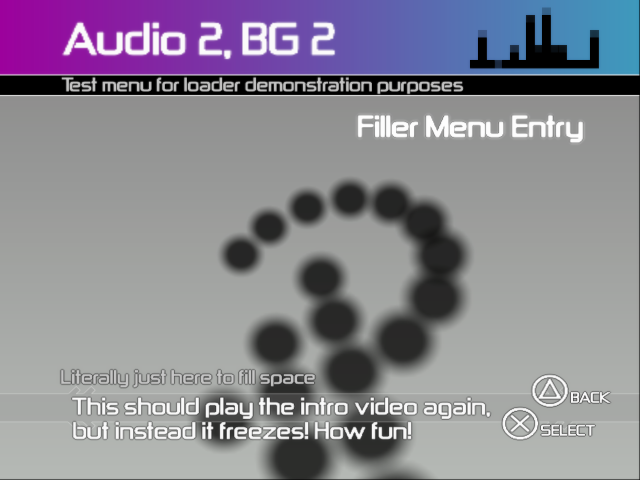
As far as putting items onto a menu goes, you’ll need two blocks for each one, an Option block and a Link block. The Option block is what will actually be displayed in the menu, and the Link block is what sets what it does in practice, like going to another menu or loading a file. (As for why they’re separate, beats me, but I’m guessing Sony of Europe wanted the option to reuse Link blocks for the same game or same video.)
Menus have by far the most options you can set out of any of the blocks, most of which I won’t go into here. Read later on for all the various ways you can customize a menu.
Option block
*option=VIDEO_1
NAME=Filler Menu Entry
LINK_DESC=Literally just here to fill space
LINK=VIDEO_LINK
The name of the menu option is specified in the Option block, and (half of) the flavor text for that menu option is specified in the corresponding Link block.
As far as I know, LINK_DESC only appears on submenus, not the main menu. If specified, smaller text will appear above the main flavor text bar. If you omit it, no text will appear on the screen, no harm done, so no worries if you don’t want it.
If you go over six options for the root menu block, they’ll still work, but they’ll run off the screen with no scroll. Submenus do scroll, so feel free to put a good few on each one.
Link block
The Link block is what its corresponding Option block will try to load. As far as I know (though that’s certainly not exhaustive), Link blocks can be set to three types, MENU for menus, PLAYABLE for demos, and VIDEO for videos.
For links that go to menus, the block looks like this:
*link=LINK_7
NAME=Test menu for loader demonstration purposes
TYPE=MENU
GOTOMENU=MENU_7
First comes the name of the block, as always, then the NAME field appears either underneath the Option name on the main menu or set in the flavor text bar at the bottom of the screen on submenus. (Like the disc splash text, you can have line breaks in the NAME field. See the video example in a moment.) If you omit it, no flavor text will be displayed. GOTOMENU should point at a valid menu.
For executables, the Link block will look something like this:
*link=RETAIL_LINK
NAME=In-store demonstration with many unfinished charts
TYPE=PLAYABLE
FILENAME=SLUS_291.98
IOPIMAGE=300
SPLASH=Loading GH2 Retail Demo...
Instead of a GOTOMENU field, you now get a FILENAME field. FILENAME points to the executable to load, of course. Remember to use backslashes and not forward slashes in the path, or else you’ll get kicked back to the BIOS.
IOPIMAGE is which version of the IOP instruction set the disc uses. While I don’t think it much matters since most demos on these demo discs packed in their own IOP image, I always like to copy all the relevant IMG files to the SCEE_DD folder and set this correctly just in case. If you set an IOP image value that doesn’t exist, the loader will freeze after the splash text. The loader itself uses IOPRP300.IMG, if you’re curious, so if you just want as few files on the disc as possible, set all the options to 300, delete the others, and call it a day.
And for videos:
*link=VIDEO_LINK
NAME=This should play the intro video again,<BR>but instead it freezes! How fun!
TYPE=VIDEO
FILENAME=SCEE_DD\OPSM.PSS
SPLASH=I warned ya!
Fairly similar, but you don’t need to set an IOP image, and the TYPE is set to VIDEO instead. I didn’t know about it when I made the loader zoo, but I now know videos can take a LENGTH field, which is in seconds, but will display in minutes and seconds in-game. (If you were to put in 120 for a LENGTH, it would display as 2:00 in the loader itself.)
Credits block
Technically, the credits block is another link, but it’ll actually go to a screen of its own if you have it set. I haven’t had much of a need for credits on my discs, but the original U$ML example we got irritatingly goes to a credits screen as the attract screen every ten seconds or so, so here’s what that looked like:
*link=CREDITS
NAME=Sobre:
TYPE=CREDITS
TEXT=PS2 MULTIEMUS
TEXT=Compilado por Adriano_Oliveira
TEXT=Para uso com o Open PS2 Loader 0.9.2
Add another TEXT field for every line of credits you want. Each field displays on its own line.
Menu customization
Menu colors
Menu colors are specified, as named, in ARGB hex. You can set six colors per menu, the left and right gradient for the top bar, and then four colors for each corner of the background. The loader will blend these into gradients, and when switching menus, the top bar will fade quickly and the background will fade more gently into the colors of the target menu.
Menu graphics (BG and widgets)
Each menu can have a different spinning background of dots applied to it using the GFX_BG option. Of these, 0 through 7, with the exception of 6 (which looks the same as 0), will give you a different animation. (I didn’t try it, but I assume leaving it off will default to 0.) Higher values loop in a modulo sorta way, where 8 is 0, 9 is 1, and so on.
-
GFX_BG=0: Generic arrow, no curve -
GFX_BG=1: “Pitchfork”, block of dots with three prongs sticking out of the top -
GFX_BG=2: Curved arrow, rotates exactly around the left point of the arrow -
GFX_BG=3: Spectrum visualizer -
GFX_BG=4: Stray X’s (made of five dots each) -
GFX_BG=5: Arrow with curve -
GFX_BG=6: Generic arrow, same as0 -
GFX_BG=7: Dots arranged to look like a radioactive symbol
There’s two extra settings that can be applied to each menu, GFX_DRAWSCANLINES and GFX_DRAWVU. These can be omitted from any menu listing or disabled using 0. When set to 1, DRAWSCANLINES will draw big chunky lines that slowly crawl upwards and then jitter downwards over the top bar, and DRAWVU will put a blocky spectrum visualizer (not a VU meter as it’s called) to the right of the top bar. It does seem to follow the music set, but at least on emulator, at a significant lag.
Text does overlap the spectrum visualizer, so be sure to keep your menu names short (~18 characters, maybe) if you enable it.
Background music
You have six valid choices for menu music, all of which are roughly ten second loops as specified in SCEE_DD\SOUNDS.PAK. (This file just seems to be a load of VAG files stuck together, end to end, with no header of its own or anything. I was able to extract all the menu loops using a hex editor to paste them into separate files and then using MFAudio to convert them. Presumably, you can also paste in your own VAG-encoded audio in much the same way, just make sure the length is the exact same as the original.)
Here’s my extracted samples. Worth noting that, because this disc originates in Europe, playing the disc on an NTSC PS2 means they’ll sound slightly faster and higher-pitched. The samples above are extracted as they are on the disc, in 22KHz mono.
AUDIOSTREAM values above 5 loop similarly to menu backgrounds. 6 is identical to 0, 7 is identical to 1, and so on.
Intro video
The intro video (SCEE_DD\OPSM.PSS) is a strange beast. It seems to be a normal, valid PSS file according to the demux tools I’ve tried, but switching out the video (or leaving it off the disc) will make the loader freeze past the startup text, and trying to play the video as a menu option will also make the loader freeze. Someone else would have to crack this nut, because I’ve just accepted its existence for now.
Loader images
Editing the images of the loader itself, such as the button icons or the logo, is seriously advanced stuff. Like a lot of PS2 games, the loader stores its graphics in TIM2 format. The only way I could extract them was through using a hex editor to copy everything from the header (which is thankfully easy to spot, do a search for TIM2, which is its magic number) to the end of the file (also thankfully easy to spot, since the graphics are bunched up together and you can use the next one’s magic number as the end of file) into a new TM2 file and using Game Graphic Studio to make my changes.
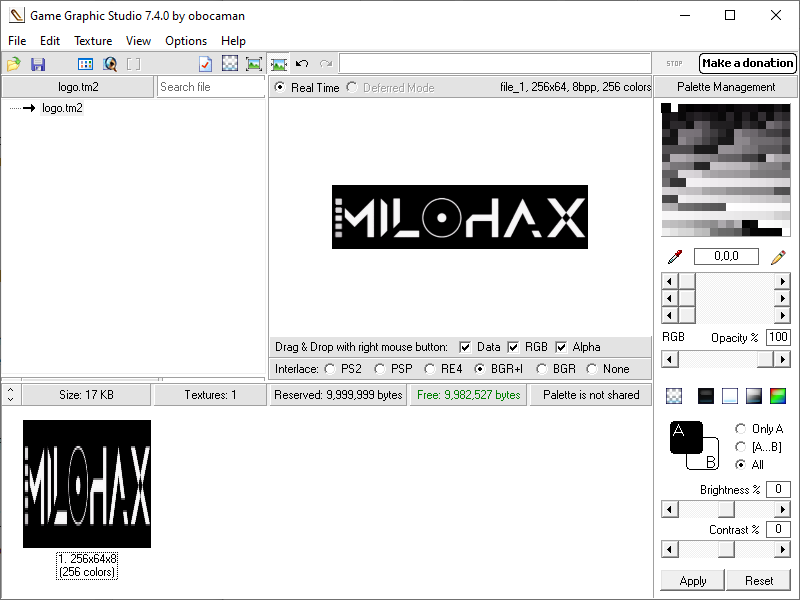
Game Graphic Studio’s interface sucks, but here’s the gist of how to replace graphics:
- Load your TM2 file into GGS. As far as I know, all OPSM graphics use black as their alpha color.
- Hit “Save As…” in the Filemenu. Save as a PNG and edit as necessary.
- Use the “Open…” dialog in the File menu to reopen your PNG. This won’t unload your TM2 file, as you can see in the bottom part of the GUI.
- If all goes to plan, you’ll see your new logo open up to the right of the interface.
- Drag it onto the squished version of the logo in the bottom part of the GUI. It’ll overwrite it.
- “Save As…” again. Yes, save the PNG again. This part might be unnecessary, since GGS doesn’t tell you when it actually saves the TM2 file, but I do this in case it saves the TM2 with the PNG. (Which would be stupid, but such is life with modder tools.)
- Reopen your TM2 file in your hex editor and copy all the data inside it.
- Go to the appropriate offset of the loader ELF as listed below in your hex editor and select all the data for that image, from magic number to EOF.
- Paste over and save the ELF. If you did it right, it’ll show in the loader when you rebuild the disc.
It’s pretty important that you keep your dimensions and also the color depth in mind, as having too many or too few colors, while it might create a valid TIM2 image, won’t be the same size as the original, and when you go to paste it into the loader, you’ll end at a different offset and the loader could potentially break. (I haven’t gone looking for if it does, but I suspect so.)
That said, TIM2 images are a bit like bitmaps in that, given the same palette and same dimensions, every image in those dimensions will be the exact same size.
For the loader logo, which I know most people would wanna change out, you’re looking at a 256×64 image with an 8-bit color depth, so 256 colors. I’ve also successfully gotten away with using 16 colors for other logos. Just make sure you’re not using too few, GGS doesn’t like fewer than 16.
Here’s the offsets and sizes for each of the loader images, in hex:
-
Loader logo: offset
59500, size4440 -
Spiral dot arrow (have yet to encounter where this goes?): offset
5D940, size4040 -
Glowy orb (possibly menu cursor): offset
61980, size1040 -
Select/back button graphics: offset
629C0, size8320
Loader zoo
I’ve created a small disc (~5MB) I’m calling the U$ML “Zoo”, intended as both a good base for a disc using this loader and a demonstration of each of the valid background graphics and menu music options. The loader really isn’t that big at all on its own, which should make rapidly prototyping menu changes and color choices a lot easier. For preservation purposes, I’ve also included the original loader ELF with the original OPSM logo, in case you don’t want to advertise our Discord server on your disc :marf:.
