Cleaning Up Late!’s Pocketwatch
- Posted by mariteaux on June 9th, 2020 filed in Remasters/Restorations
- Comment now »
One project from my “pretending to be an audio engineer” days that I’m still fairly proud of is my restoration (not remaster, will get into that) of Dave Grohl’s old Pocketwatch tape. It’s not a showy project, just a bit of a cleanup and some light mastering work (yay crossfades!), but I think it’s still better than any other transfer you’ll find, and people are still thanking me for doing it.

I include the story of the tape in a text file with the download, so I won’t get into the history too much, but in short, Dave writes songs. In 1992, Dave makes a tape of them called Pocketwatch, two copies of which end up in the collection of Jenny Toomey, who runs the now-defunct Simple Machines label. As part of their Tool Cassette series, Simple Machines hand-dubs the tapes on-demand, a manual version of, say, MP3.com’s DAM CDs. Naturally, Dave being a somewhat popular boy in a somewhat popular underwater baby enthusiast organization, Simple Machines is inundated with orders. These only worsen with the first Foo Fighters record. By 1998, Dave’s old “master” tapes have disintegrated and Simple Machines calls it quits on the Tool Cassette series. Pocketwatch now lives on as a lo-fi cult recording from a rock legend.
I recently got asked in a YouTube comment how exactly I did my restoration, and although I went into detail in that comment, I figure it’s worth a blog post since I still like the tape and still like what I did with it. So, if you’re looking to clean up a transfer of an old cassette, here’s what you should know.
Go for the lowest generation
Analog tape is imperfect. Not only do improper handling and improper storage wear on the tape, but so does copying it. See, unlike with a digital file, you can’t just “copy” a tape, as there’s no data to copy, only an electrical signal. You have to dub it. That means play back the first tape while recording a second tape, using the first tape as a signal source. The original of a tape recording is the “master” tape, and a dub of that tape is called the “second generation” of that tape.
As you can well imagine, this doesn’t do wonders for the sound quality of that tape. Since it’s analog, the levels won’t be exact, leading to either slightly more distortion or more likely a lower signal-to-noise ratio (read: more tape hiss). This, plus the original tape hiss getting on the dub, coloration of the sound from the player deck, electrical noise, and other such nasties will invariably cause the second tape to sound worse than the first. (If you’re the fool who bought into “high-speed dubbing”, it will sound even worse than a real-time dub thanks to the loss of the high end. Don’t bother.)
Now, there’s a variety of ways to hopefully minimize the noise, at least on the recorder’s end. Using a higher grade of tape stock (say, chromium over ferric, or metal even if you wanna get really quality), Dolby noise reduction (which some people hate, perhaps rightfully, but it is an option), and just plain giving a fuck all help. After the tape’s been dubbed though? It’s done. You cannot make it sound any better. At best, you can reduce your problems, things like mains hum or an overly-dynamic signal, but making a 4-tracker sound like a studio recording, you wish. And I wish too. We’re operating in the little that you can do today.
To tie this back into Pocketwatch and demonstrate how gens can add up: Dave recorded these songs in three sessions, two at Laundry Room Studios and one at WGNS, on half-inch reels. These were probably dubbed down to cassette copies Dave took home (second generation), which were then dubbed to two sequenced duplication masters for use at Simple Machines (third generation), and then dubbed by hand on their Tool Series decks (fourth generation). This is likely not exhaustive. Age of the tapes matters a lot too, and you can bet those dub masters were being handled a lot, so dubs from 1992 likely sound noticeably better than dubs from 1997.
Now, my copies of the sessions were marked as ANA(3) (session master -> Dave’s copy -> dub of Dave’s copy, all analog tape). This means they’re at least as good sounding as the original dub masters Simple Machines was using to dub copies of Pocketwatch. If you’re looking to clean up a tape source, your best bet is to transfer from the lowest generation tape you can get your hands on.
Don’t bother cleaning up lossy sources
This wouldn’t have happened if those transfers were MP3s. MP3, and really any lossy format, naturally filters out some of the audio, making a proper restoration pretty much moot.
If you do get your hands on some rare audio that happens to only be available in lossy, please keep it in its original format and don’t edit it. Generations affect lossy audio too, and just as badly. It’s called “transcoding”, and regardless of how high you set your bitrate, it will still sound worse than a copy made at that bitrate from a lossless source. (For uploading rare lossy audio to YouTube, I use ffmpeg to insert the audio stream directly into a video container, so as to not reencode it more than I have to. I can’t control YouTube’s processing, but I can control my own.)
If you’re making your own transfers, you’re best off transferring to a lossless format (FLAC is good, ALAC is good) at at least 44.1khz. 48khz is a little overkill (Really bad tapes lowpass around 12khz, while the best can go up to 19khz, neither need the headroom), but it can’t hurt. Either way, don’t damage your audio. There’s no excuse not to use lossless at this point.
There is no “remastering”
This is more a mini-rant than anything else, but building off my earlier point, you can’t “remaster” something for which you have no multitracks to. To clear up the terminology, you have the 16- or 24-track half-inch reels the studio used, and those are your multitracks. Those get mixed down to work tapes, those work tapes being where your cool “early mix” bonus tracks come from. The mixed version of the album gets transferred to a master tape, where another engineer takes care of the sequencing and final round of mixing to sweeten or make the tracks sound more consistent. This master tape is then what CDs, vinyl, and other cassettes are made from.
If you don’t have the multitracks from which to create another sequenced master tape from, you’re not remastering. You’re restoring. Remastering fixes problems in levels, removes awkward, dated effects, puts the focus on different instruments, or potentially just brickwalls the entire thing, if you fucking suck. If you can’t do any of that without just overdubbing more shit onto the recording you’ve got, it isn’t remastering. Restoring is mostly just cleaning up what you’ve already got; a bit of EQ, a bit of noise reduction, maybe even a bit of compression.
I bring this all up to further emphasize the point that you cannot fix it in post. More processing than necessary is nearly always a bad thing. Hell, some people consider any processing to be a bad thing (which is why you should always notate noise and speed correction on your source notes!). Whatever I’m about to tell you to do, do it with as light a touch as humanly possible, because this stuff will damage your audio.
Okay so tell me how to clean up what I’ve got dammit
I’m sure you can get better results with Izotope or something, but remember that throwing tech at a problem does not necessarily solve it. In my case, I used good ol’ Audacity.
Now, I was supremely lucky; since I didn’t transfer the original tapes, I was at the mercy of whoever did, and they left on several seconds of negative space on both ends of each track. If you’re doing noise reduction, this is important, as Audacity will use this to get an idea of what to filter out. Switch into spectrogram (in the track name dropdown in the top left of the track), select as much not-song as you can, go into “Effect”, select “Noise Reduction…”, and get a noise profile. Then go back into the effect when it’s done. You’re ready to start attacking it.
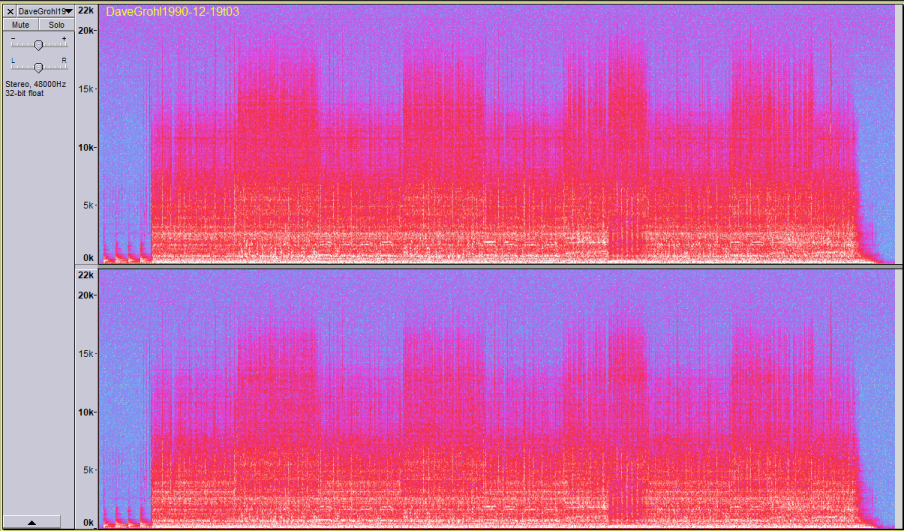
Now, here’s the thing. You really don’t want to be aggressive with the noise reduction. If you do, you’ll take some of your actual audio with it. Ever heard a bad quality YouTube video or MP3? You know that “chirping” that you get, especially in stuff like noise and handclaps and snares? You’ll get that if you’re not careful with the noise reduction.
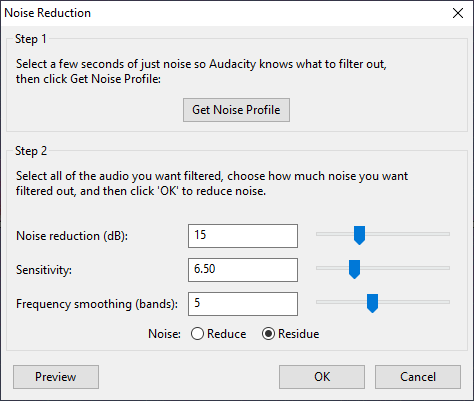
Noise reduction is mostly three sliders: the amount to reduce by, in decibels, the sensitivity of the filtering algorithm, and “frequency smoothing”. The sensitivity controls how much of the audio is considered to be noise. If you set the first two too high, there’s a chance you’ll take some of the actual audio with it, leaving you with that “chirping” I mentioned earlier.
Frequency smoothing is very much a last resort. It’ll try to “blur” the sound that remains a little around the edges essentially to get rid of some of the chirping. It can work, but it’s more processing done to your audio, which again, is more often than not a bad thing. Still, I tend to leave it around 4-6 (the examples below all used 5), but I’m absolutely not telling you which settings to use here. Use your ears.
So for the first two sliders, start low, and for frequency smoothing, start off. Set the “Residue” radio button; this is a wonderful debug option that will leave only the noise behind, which is fantastic for fine-tuning the cleanup settings.
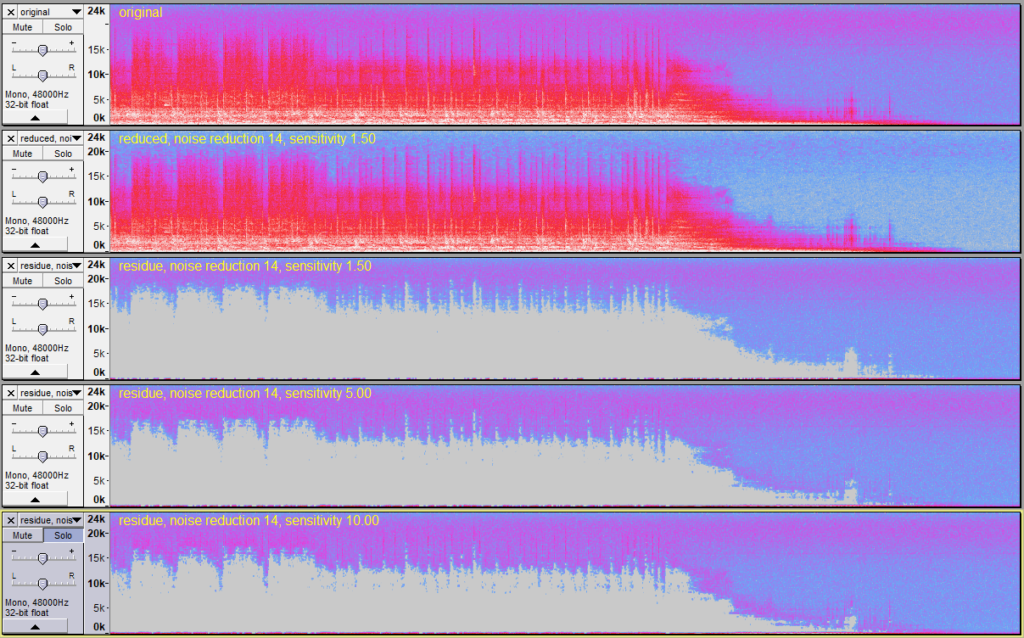
Needless to say, unless you’re cleaning up pure spoken word, I do not recommend sensitivity values higher than 3 or so. For noise reduction values, over 15 or so gets kinda artifacty in spots for this song. A song with more high-frequency content is likely to take a beating around there. You’ll need to play around with these in any case. Increase as necessary, listening to the (boosted) residue and making sure you’re not taking some of the audio with your noise reduction.
And really, that’s about it! Aside from some EQ to kill the harshness and some minor “mastering” tweaks to my tastes (fading out “Petrol C.B.” early, crossfading “Winnebago” and “Bruce”, ensuring two second silences between songs), that’s the bulk of what I did to the tape. You’ll now have a much higher signal-to-noise ratio and can boost the audio further, maybe even compressing it if you’d like to get it even louder (though I don’t compress because compression is gay).

One final note about Pocketwatch is that I’m fairly certain a CD-quality version of the tape does exist. If you recall the 2015 Songs From the Laundry Room EP, that version of “Kids in America” comes from the same session as “Petrol C.B.” and is far clearer and less noisy. Better yet, the deluxe edition of In Utero has a “demo” version of “Marigold” on it, again from the same session, and utterly blows even my Pocketwatch‘s version away. I didn’t even know there was reverb on Dave’s voice until I heard it!
Think that should give you an even better idea of why master tapes are so important; even two generations is enough to make something go from studio-quality to “lo-fi”. If you want a CD-quality Pocketwatch, I’d suggest bugging Dave or Barrett. I’d certainly buy it.
